Issue
In the RSA Security Analytics UI you cannot create a custom feed that has two or more MetaCallback keys (multiple indexes).
Tasks
This article explains how to manually create a custom feed that has two or more MetaCallback keys (multiple indexes).
Resolution
Steps for creating custom feed with multi MetaCallback keysWithin the UI you can't create a custom feed with multiple MetaCallback keys (multiple indexes) while using the Custom Feed Wizard. To create this type of feed you will have to make a custom XML feed file. Here is an example of a XML file and the comments are denoted by .(In our interface the comments are not supported so if you use this as a template you will have to delete the comments for this file to work or you will get compile errors)
1. Create custom xml file
<FDF xmlns:xsi="http://www.w3.org/2001/XMLSchema-instance" xsi:noNamespaceSchemaLocation="feed-definitions.xsd">
<FlatFileFeed name="CustomFeed" <!-- The name you want to give the file -->
path="CustomFeed.csv" <!-- This is the name of the csv file that you create -->
separator=","
comment="#">
<MetaCallback name="AliasHost"> <!--Callback key 1 -->
<Meta name="alias.host" valuetype="Text" ignorecase="true"/>
</MetaCallback>
<MetaCallback name="Domain"> <!--Callback key 2 -->
<Meta name="domain" valuetype="Text" ignorecase="true"/>
</MetaCallback>
<LanguageKeys>
<LanguageKey name="alert" valuetype="Text"/>
</LanguageKeys>
<Fields> <!--This is what references the code in the CSV file-->
<Field index="1" type="index" key="AliasHost"/> <!--First column in the CSV file-->
<Field index="2" type="index" key="Domain"/> <!--Second column in the CSV file-->
<Field index="3" type="value" key="alert" /> <!--Third column in the CSV file-->
</Fields>
</FlatFileFeed>
</FDF>
2. Create custom CSV file
After creating your custom XML file you will need to create a custom CSV file. As stated in the above XML file the default values for comments are “#” and separator are “,”. Below is an example of a CSV file that works with the above XML file.
ns1.google.com,google.com,blacklist
web.microsoft.com,microsoft.com,whitelist
domains.godady.com,godaddy.com,whitelist
3. Copy the XML and CSV files to the appliance
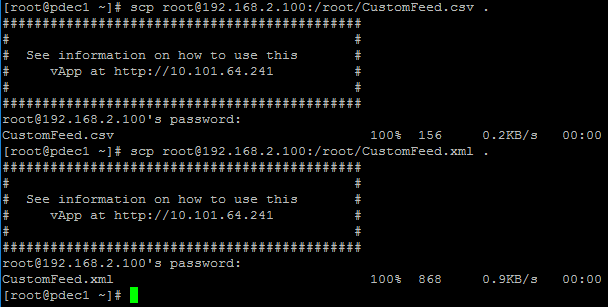
Since the UI Custom Feed cannot be used for generating the custom feed it must be manually compiled and copied to your Decoders (Log/Packet). Take the XML file and CSV file and move the files over to a decoder with this command "scp root@x.x.x.x:/root/CustomFeed.csv” The x’s represent the ip address of the location you are copying the files from. The screen shot below shows this process.
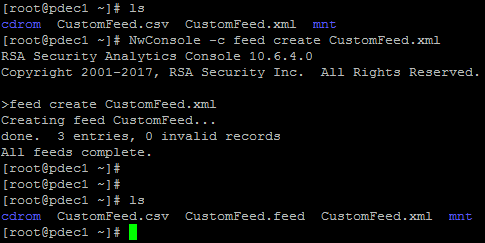
4. Check to make sure files are on device
Once you have the files on the device as shown below we can now start the process of compiling and loading the custom feed.

5. Creating the CustomFeed file
We will need to do the following command to create the custom feed as shown in the picture below.
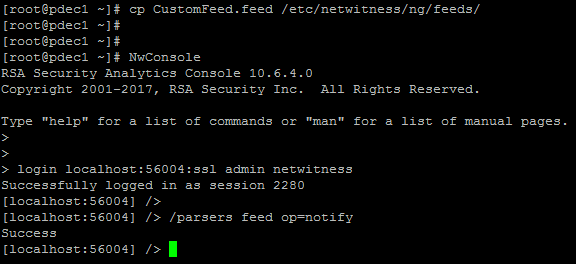
6. Copy the CustomFeed.feed file to the feeds directory
You should have 0 invalid records as shown in the above picture.
You now must copy the CustomFeed.feed file into the /etc/netwitness/ng/feeds directory and issue a reload of the feeds as shown in the picture below.
7. Restart the appliance to check the feed loaded
We should check our work and review the /var/log/messages to make sure that the feed is being loaded. The op=notify option from the previous step tells the service to load the feeds at a later time. If you want to load them immediately and see that it has detected the feed correctly the decoder service can be restarted. From the UI click on Administration -> Services and find the decoder with the loaded feed and click on Actions then Restart. An example of the log message of the feed being reloaded is in the picture below.
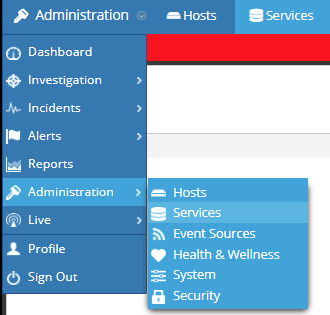
8. Steps to see custom feed in the Web UI
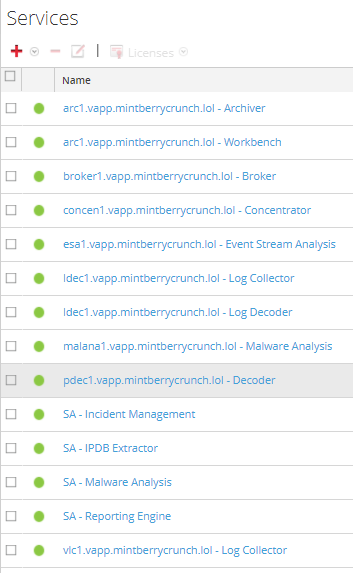
Under the UI you will only be able to see the feed in one place. You will be able to see the feed if you choose from the drop down tab Administration -> Services (see screenshot below)
Then click on the device that has the feed. (see screenshot below)
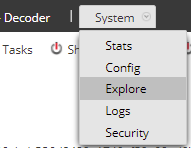
Click on the tab that says “System” and select Explore. (see screenshot below)
On the left hand side select the /decoder/parsers/feeds/”your feed name” and you can see the stats on your feed.(see screenshot below)

Notes
If you try to edit the XML file and upload it through the GUI you will get and error and it will not work. (See screenshot below)
Note: Any feed created according to this knowledge base article cannot be set as a recurring feed unless a custom script is created (outside of the scope of this article).
Note: Once the feed is compiled it is up to the customer to manually copy it to any other decoders within the environment and to follow the service restart process on each. Since the feed was not created by the UI every time the feed needs updated this manual process will need to be replicated.
Product Details
RSA Product Set: NetWitness, Security AnalyticsRSA Product/Service Type: Packet Decoder, Log Decoder, User Interface, Content
RSA Version/Condition: 10.6.x
Platform: CentOS
O/S Version: 6.7
Summary
Looking for a way to create custom feeds that contain multiple indexes. This multi-index feed allows for comparison of multiple columns within the CSV file and allows for more specific identification of sessions/logs.
Approval Reviewer Queue
Technical approval queue