Issue
Single disk in DAC has the status of U for Unconfigured Good in nwraidutil.pl output. There is already a Hotspare present in the DAC of the same disk type.
Below example is a Decoder DAC with 2.5 TB drives in a 32 TB DAC.
nwraidutil.pl output (Physical Disk Information)
Adapter 1 enclosure 15 slots found: 15
Encl Slot State P.Fail.Count Raw Size Drive FW Inquiry Data
15 0 (O) 0 2.728 TB C1D6 HITACHI HUS72303CLAR3000C1
15 1 (O) 0 2.728 TB C1D6 HITACHI HUS72303CLAR3000C1
15 2 (O) 0 2.728 TB C1D6 HITACHI HUS72303CLAR3000C1
15 3 (O) 0 2.728 TB C1D6 HITACHI HUS72303CLAR3000C1
15 4 (O) 0 2.728 TB C1D6 HITACHI HUS72303CLAR3000C1
15 5 (O) 0 2.728 TB C1D6 HITACHI HUS72303CLAR3000C1
15 6 (O) 0 2.728 TB C1D6 HITACHI HUS72303CLAR3000C1
15 7 (O) 0 2.728 TB C1D6 HITACHI HUS72303CLAR3000C1
15 8 (O) 0 2.728 TB C1D6 HITACHI HUS72303CLAR3000C1
15 9 (U) 0 2.728 TB C1D6 HITACHI HUS72303CLAR3000C1
15 10 (O) 0 2.728 TB C1D6 HITACHI HUS72303CLAR3000C1
15 11 (O) 0 2.728 TB C1D6 HITACHI HUS72303CLAR3000C1
15 12 (O) 0 2.728 TB C1D6 HITACHI HUS72303CLAR3000C1
15 13 (O) 0 2.728 TB C1D6 HITACHI HUS72303CLAR3000C1
15 14 (GEI) 0 2.728 TB C1D6 HITACHI HUS72303CLAR3000C1 Hotspare Information
nwraidutil.pl output (Logical Disk Information) shows VD 1 consists of 10 rather than 11 disks.
Virtual Disk: 0 (O) - Found 3 of 3 {Raid Level 5, 5.457 TB, 128 KB Stripe Size, WriteBack, ReadAdaptive, Cached, Write Cache OK if Bad BBU}
PD: 0 Enclosure: 15 Slot: 0 (O) 2.728 TB HITACHI HUS72303CLAR3000C1D6YVKWS6LK
PD: 1 Enclosure: 15 Slot: 1 (O) 2.728 TB HITACHI HUS72303CLAR3000C1D6YVKWBMYK
PD: 2 Enclosure: 15 Slot: 2 (O) 2.728 TB HITACHI HUS72303CLAR3000C1D6YVKWRBDK
Virtual Disk: 1 (O) - Found 10 of 10 {Raid Level 5, 24.556 TB, 128 KB Stripe Size, WriteBack, ReadAdaptive, Cached, Write Cache OK if Bad BBU}
PD: 0 Enclosure: 15 Slot: 3 (O) 2.728 TB HITACHI HUS72303CLAR3000C1D6YVKWBM6K
PD: 1 Enclosure: 15 Slot: 4 (O) 2.728 TB HITACHI HUS72303CLAR3000C1D6YVKWBNDK
PD: 2 Enclosure: 15 Slot: 5 (O) 2.728 TB HITACHI HUS72303CLAR3000C1D6YVKWR87K
PD: 3 Enclosure: 15 Slot: 6 (O) 2.728 TB HITACHI HUS72303CLAR3000C1D6YVKUM7BK
PD: 4 Enclosure: 15 Slot: 7 (O) 2.728 TB HITACHI HUS72303CLAR3000C1D6YVKSZKBK
PD: 5 Enclosure: 15 Slot: 8 (O) 2.728 TB HITACHI HUS72303CLAR3000C1D6YVKUS6JK
PD: 6 Enclosure: 15 Slot: 10 (O) 2.728 TB HITACHI HUS72303CLAR3000C1D6YVKWKL5K
PD: 7 Enclosure: 15 Slot: 11 (O) 2.728 TB HITACHI HUS72303CLAR3000C1D6YVKWKM5K
PD: 8 Enclosure: 15 Slot: 12 (O) 2.728 TB HITACHI HUS72303CLAR3000C1D6YVKUR9XK
PD: 9 Enclosure: 15 Slot: 13 (O) 2.728 TB HITACHI HUS72303CLAR3000C1D6YVKS3N4K
Under adapter status there are no degraded or offline Virtual Disks (VDs)
[VD's Offline] 0
Cause
The most likely cause is the DAC being added (using a script like NwInitArray or the newer NwArrayConfig.py) while the disk was not available for use in the DAC. Causes include disk being in a state other than U for Unconfigured such as B for Bad State or simply wasn't inserted properly at the time the script was run.Note: If the DAC has no data and this is detected before the appliance is put into live production, then the DAC can be removed cleanly using steps such as those outlined in How to manually remove a JBOD/DAC that has been added to an RSA Security Analytics appliance
This KB focuses on the situation where there is data on the DAC which needs to be retained.
Workaround
The following set of steps is for a packet decoder. If steps are needed for a disk in 2nd DAC or for a Log Decoder or Concentrator then modifications need to be made.
The below instructions are split into 3 sections:
- Preparation
- Increasing the Size of the Volume
- Reconfiguring the Service to Use the New Volume Size
Preparation:
- Stop Packet capture from SA UI > Decoder > System page
- SSH to Packet Decoder and run the commands below.
If running Security Analytics/NetWitness for Log and Packets >= 10.4.0 then need to stop puppet service to avoid it restarting nwdecoder while performing the rest of the steps:# service puppet stopStop packet decoder service:# stop nwdecoderIf Security Analytics/NetWitness for Log and Packets >= 10.4.0 can also stop the following 2 services to avoid error messages in logs while performing the procedure:# stop nwappliance
# service collectd stop - Unmount volume to avoid changes while performing below procedure:
# umount /var/netwitness/decoder/packetdbIf umount fails, then comment out the following line by adding # to start of the line in /etc/fstab and reboot the operating system/dev/mapper/decoder-packetdb on /var/netwitness/decoder/packetdb type xfs (rw,nosuid,noatime)
Increasing the Size of the Volume
- Note size of /var/netwitness/decoder/packetdb (should be 25T)
# df -Ph /var/netwitness/decoder/packetdb
Example Output:/dev/mapper/decoder-packetdb 25T 8.4T 17T 35% /var/netwitness/decoder/packetdb - Add the missing drive to the correct Virtual Disk (VD 1) in Adapter 1.
# /opt/MegaRAID/MegaCli/MegaCli64 -LDRecon -Start -R5 -Add -physdrv[15:9] -L1 -a1
Where LDRecon is the command used to reconstruct the virtual RAID, R5 is the RAID type, L1 is the logical volume, a1 is the adapter number.
Note: The information provided is for example purposes only.
- Show the progress of the drive add. You may not see the drive as part of the VD until progress has reached 100% complete.
# /opt/MegaRAID/MegaCli/MegaCli64 -LDRecon -ShowProg -L1 -a1
- Additional command to view all 11 drives appear. Also, use this command to verify you have the right VD.
# /opt/MegaRAID/MegaCli/MegaCli64 -LDInfo -L1 -a1
- Perform a 'pvresize' to increase size of LVM Physical Volume
# pvresize /dev/sdd
- Do a pvdisplay to see the addition of the free available space (column called PFree). Check /dev/sdd in the output.
# pvdisplay -C
Example Output:PV VG Fmt Attr PSize PFree DevSize PV UUID
/dev/sda2 VolGroup00 lvm2 a--u 930.47g 0 930.49g VLpHya-bKlX-c4su-Gn9L-QnGZ-RH4S-u47EQ2
/dev/sdb1 VolGroup01 lvm2 a--u 930.97g 528.97g 931.00g hd3YuD-KPRY-O59l-hQ6v-ItQT-cd1K-yAYith
/dev/sdc decodersmall lvm2 a--u 5.46t 0 5.46t HaBXxt-lgVG-Rgtw-rxkX-0K8D-npcT-PFNQ2s
/dev/sdd decoder lvm2 a--u 24.56t 2.73t 24.56t oOjYv6-Lu3R-9766-Y2Mx-2r1N-f92w-6mTg1J
/dev/sde decoder0 lvm2 a--u 23.64t 0 23.65t UF0GRn-NyxV-iVkt-YPYY-qIcY-0mv2-bGek4o - Make LV inactive (precaution only against shared use if volume is already unmounted)
# lvchange -an /dev/decoder/packetdb
- Now perform an lvextend command in order to resize the LVM logical volume
# lvextend -l +100%FREE /dev/decoder/packetdb
Example Output:Size of logical volume decoder/packetdb changed from 24.56 TiB (642802 extents) to 27.29 TiB (714254 extents)
Logical volume packetdb successfully resized
Note: /dev/sdd is used by VG decoder. If you cannot resize, please check that you have the correct volume name.
- Make LV active again and check with pvscan that it shows as ACTIVE
# lvchange -ay /dev/decoder/packetdb# pvscan | grep /dev/decoder/packetdbExample output:ACTIVE '/dev/decoder/packetdb' [27.28 TiB] inherit
- Remount the volume (in preparation for xfs_growfs)
mount /dev/decoder/packetdb
- Use xfs_growfs command on mounted volume to grow the filesystem to new size
# xfs_growfs /var/netwitness/decoder/packetdb
- Check integrity of XFS file system
# xfs_check /dev/decoder/packetdbIf you see any issues you may need to run xfs_repair
- Check new size of /var/netwitness/decoder/packetdb
# df -Ph /var/netwitness/decoder/packetdb
Example Output:Filesystem Size Used Avail Use% Mounted on
/dev/mapper/decoder-packetdb 27T 8.4T 18.6T 31% /var/netwitness/decoder/packetdb - Restart services
# service puppet start
# start nwdecoder
Reconfiguring the Service to Use the New Volume Size
- Once service is sufficiently initialized, run database reconfig to calculate the new packetdb size in explorer view:
- SA UI > Services > Packet Decoder > Explore
- Right-click on the database and select 'Properties'
- Run the 'reconfig' utility, so that the correct size can be updated
a. In the drop-down, select reconfig and enter update=false (or update=0) in the Parameters field and hit the Send button.
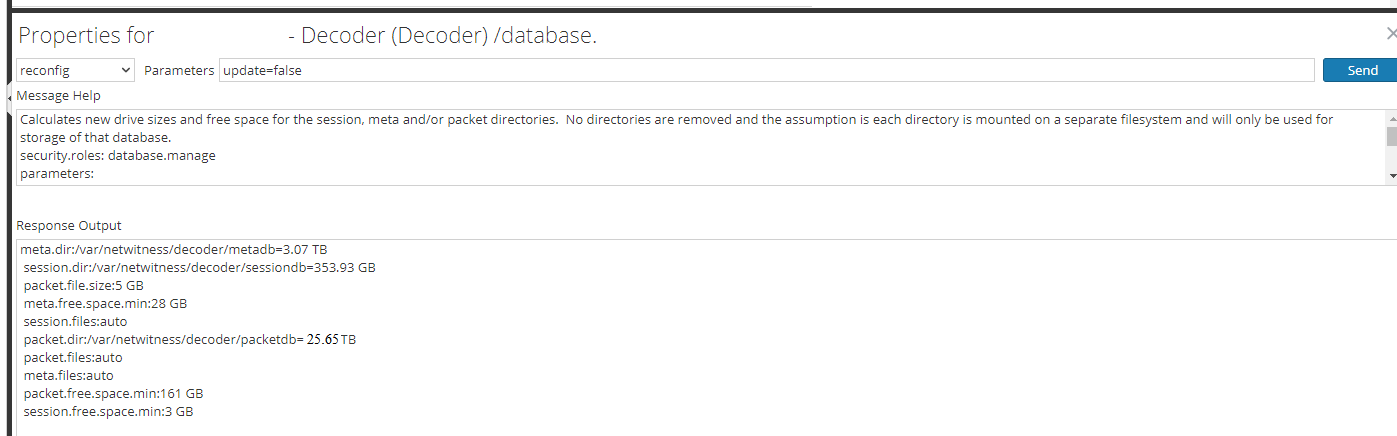
b. Verify the new size of packet.dir (calculated as 95% of volume size seen in `df -hP` or the slightly more accurate `lvdisplay -C`)
c. Expand out database/config and in right-hand pane double click on packet.dir and update with new value from the previous command output of 1b
- If packet.dir shows as red, then you will need to restart the decoder service in order to reload service with new setting. Stop decoder capture and restart service if necessary.
Notes
Warning: This procedure does represent some risk in terms of data loss (which is why this KB is internal only)Product Details
RSA Product Set: Security AnalyticsRSA Version/Condition: RSA NetWitness Logs & Packets/Security Analytics 10.x and later
O/S Version: 5, 6
Platform: CentOS
Platform (Other): Series 4 Appliances, S4S Appliances, Security Analytics Appliances, MegaCli Hardware RAID
O/S Version: EL5, EL6
INTERNAL ONLY !!!!
Summary
A customer suspected that the drive was failed but in fact it was never added as part of the NwArrayConfig script. Also it should be noted that the hotspare is in the wrong location.
Approval Reviewer Queue
RSA NetWitness Suite Approval Queue